 |
E-bike conversion |
E-bike Legal |
E-bike battery |
E-bike electrics |
Side stand |
Steering damper |
Electric m/c |
 The
e-bike
battery.
The
e-bike
battery.To power my first e-bike, I bought a TLH 36V 15.6 Ah Li-ion battery with charger. This came without any documentation or instructions; but its operation seemed to be fairly self-explanatory. There is an LED status indicator that lights at the press of a button if the charger is plugged in and switched on, or if the battery is switched on. A mounting plate and connector fits onto the bike-frame down-tube, the battery unit slides on to it and is locked into place using a supplied key. An immediate issue I had with the Sterndale mountain bike frame however, is that there was only enough room for the battery on the front down tube, and the battery-plate bolt holes were too high-up to mate with the bottle holder attachment points. The work-around was to mount the battery upside-down. I also found that the heads of the M5 Allen screws that came with the bike were too proud to allow the battery to slide onto the plate; and the solution was to replace then with A4 stainless hex-head M5×12 screws with thin washers.
The mounting plate system allows the battery to be taken away for charging or storage, but there is no obvious reason why it cannot also be charged in situ. The battery charger gets quite warm in use, so is best placed on a wire trivet, or a luggage rack, or otherwise suspended so that air can flow over it. Charging the battery from half to full takes about 3 hours; and the charger is small enough to take with you if you are going somewhere with mains electricity. Once charging is complete, the LED on the charger changes from red to green, and the charger cools down (indicating that the charging current has been switched off).
My battery installation, unfortunately, developed a major problem after a few days riding. This was to do with the electrical connection between the battery housing and the mounting plate. Four flat pins on the plate mate with receptacles on the pack. I noticed during the installation that the four pins were chromium plated. This is one of the worst conceivable plating materials for a low voltage connector, because chromium has a habit of forming a tough non-conducting oxide layer on exposure to air. Still, the connectors were doubled-up, two for (+) and two for (-), and so I put my initial doubts aside and presumed that the arrangement must be OK in practice. Using the battery upside down however, it transpires that the connector is not quite as fully inserted as it would be with the assistance of gravity. The same situation might also arise if the battery were to be mounted horizontally. This no doubt contributed to the problem that emerged, for which the symptoms were: random loss of power, and random shutting down of the system. It was initially difficult to identify the cause, and the misbehaviour grew progressively worse and soon made the bike unusable. Eventually I worked-out what was happening by running the bike on a bike-stand and measuring the supply voltage at the input to the motor unit. Random shut-down was caused by large fluctuations in the on-load voltage, and the fault could be reproduced by rattling the battery pack up and down on its mounting plate. Careful inspection then showed that one of the connections had been getting hot and had started to melt the surrounding plastic. Also, since the connections are doubled-up, this indicates that its partner was barely working at all.
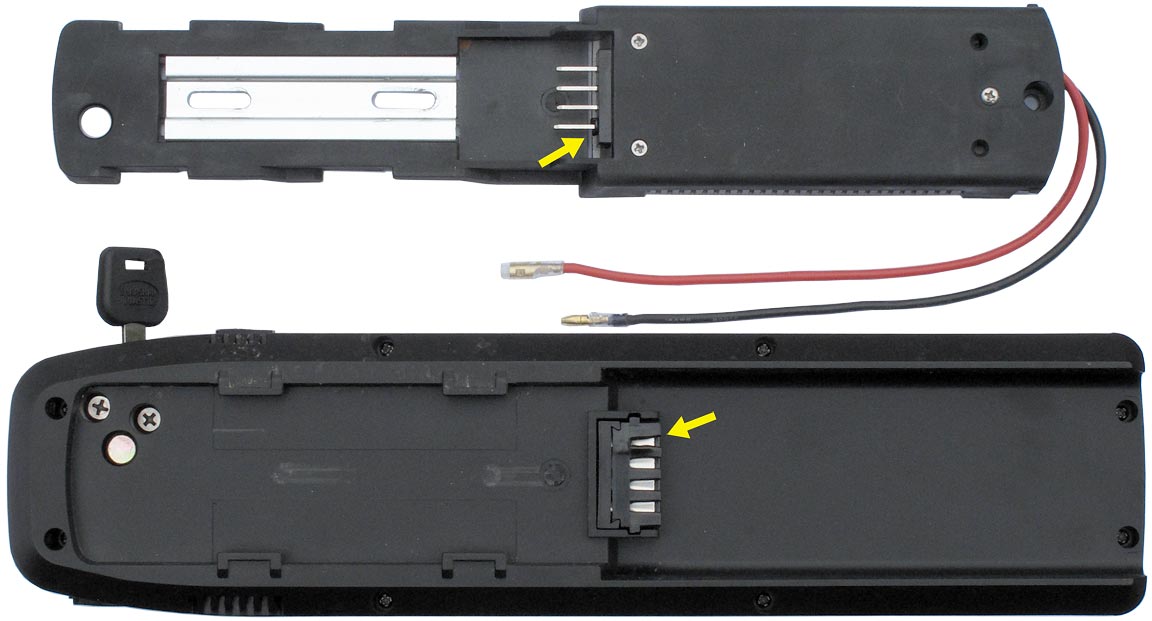
Mounting plate and battery pack,
with signs of connector overheating.
I might at that point have decided to demand a replacement battery, but that would not have solved the problem of having to use it upside down. Also, I do not think that the connector is fit for purpose, even if it is used the right way up. I therefore decided to forfeit the warranty and solve the problem by modifying the battery pack. I did that by installing a female XT60 connector, which, as the name implies, is rated for 60 A. XT60s have gold-plated solid copper pins and receptacles with a high contact area, and so have extremely low resistance. Note that carrying out modifications to a vehicle battery pack carries a risk of fire or explosion, and is therefore a job for a competent electrical technician (please also see my Disclaimer).
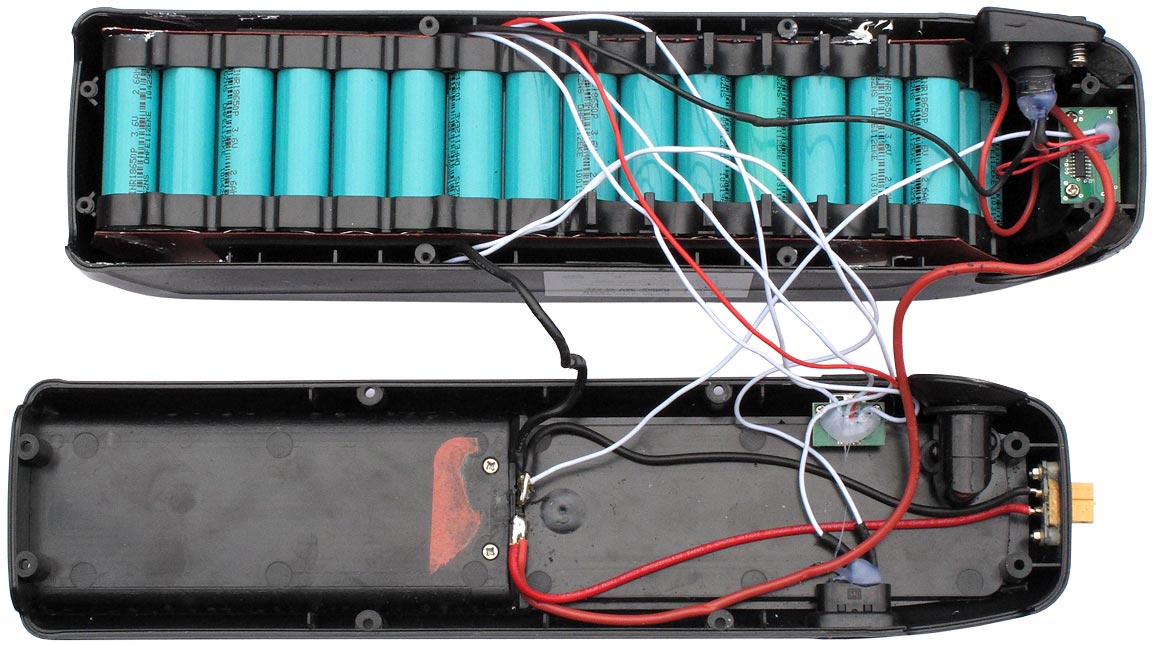
Battery pack with XT60
wired across the existing connector.
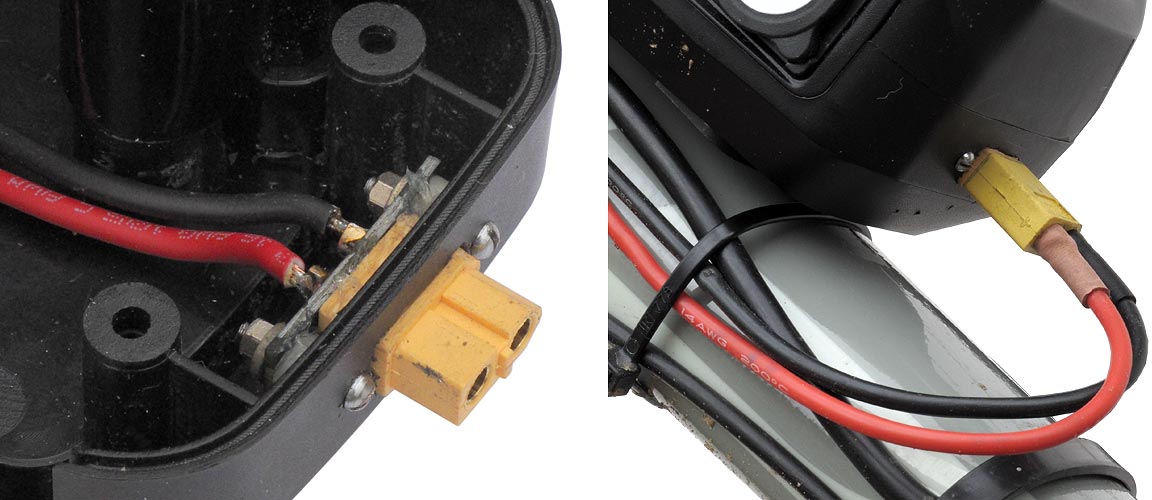
XT60 connector detail.
A small circuit board can be purchased for the XT60, enabling both the male or female types to be used as bulkhead connectors. To prevent accidental short-circuits, connectors on battery packs must, of course, be female; so I fitted a board to a female connector and mounted it on the battery case. In doing that, I made a couple of pilot holes in the bottom part of the battery pack, and fashioned an XT60-shaped hole in the ABS using a modeling knife and some small round and square rough-cut files. When mounting the connector, I placed a couple of spacers on the retaining screws, to minimise the protrusion, and sealed the connector body into the hole I had made using architectural silicone. I wired the XT60 directly across the existing connector, thereby retaining the normal functionality (for what it's worth), and also siliconed around the original connector to improve the weatherproofing. Finally, on reassembly, to minimise water ingress as far as possible, I taped the join between the upper and lower parts of the ABS housing. Note that it is possible to buy silicone rubber caps for female XT60 connectors. These will exclude dirt and help to prevent short-circuits in the event that the battery is stored or used on a bike with the standard connector.
Having opened the battery pack, I had an opportunity to make observations that would not otherwise have been possible. I noticed that the On-Off switch is not capable of handling the current required by the Bafang motor, and this function is instead accomplished by using the switch to turn on a transistor. Presumably, the cost of a small switch and a MOSFET is less than that of a high-current switch. The use of a transistor also implies the presence of a Battery Management System (BMS), important functions being to protect against excessive charging current and external short circuits. A somewhat worrying feature however, is that plugging-in the charger also switches-on the battery output,which is how the press-button battery-level indicator comes to work either when the battery is on, or when the charger is in. This means that charging the battery while it is installed on the bike has the effect of turning it on. The bike, of course, does not wake-up unless the handlebar power button is pressed, but it means that the the motor will not go to sleep straight away if the charger is plugged-in before the battery is turned off. Whether this is a serious issue is moot, but it is not ideal. "Off" should mean "Off".
The appalling chromium connector seriously coloured my initial impressions of riding the bike. I came to the (very-pessimistic) conclusion that the motor makes a rather feeble contribution to the rider's efforts, and while it did (initially) enable me to get up the hill from Ottery without stopping, I still had to do quite a lot of work. I also noted that, while the twist throttle could start the bike from standstill on level ground, it could not do so on a 5% gradient. The effect of fitting the XT60 connector, and thereby discovering the actual capabilities of the motor, was consequently astonishing.
Although the following calculation involves some conjecture, we can easily get a rough idea of just how deleterious the original connector was. If the Bafang BBS01 were to have a peak power consumption of 250 W at 36 V, it would require a current of 6.9 A. In reality however, if it is to deliver 250 W to the road, it needs a somewhat greater input than that, probably approaching 300 W. This means that weshould expect a typical peak current of about 8.3 A, or say 8 A in round numbers. Hence, in the state of maximum demand, the motor looks something like a 36/8 = 4.5 Ω resistance.
Now, if the connector were to have a resistance in the region of 1 - 2 Ω, then at times of peak power demand, it would be expected to cause a voltage drop of between about 6.5 and 11 V. Instead of a nominal 8×36 = 288 W input to the motor, we would have between (36-6.5)2/4.5 = 193 W and (36-11)2/4.5 = 139 W. Approximately halving the motor power would indeed result in very feeble performance, and the reduced voltage is likely to cause the controller to assume the battery to be dead and switch off.
When I built my second e-bike, I bought the same model of battery again but fitted an XT60 connector immediately.
A further issue I found with the battery mounting system was that it allowed the battery to wobble from side to side while making disconcerting creaking noises. I felt that this situation would eventually lead to fatigue of the plastic, and the battery would at some point fall off the bike. The obvious solution, to a SCUBA diver like the author, was to attach the battery to the bike frame using a pair of rubber diving-knife leg-straps. The arrangement is shown below and gives perfect security. The plastic-buckled straps used in this case are made by Beaver Sports and, while having good elasticity, show no obvious degradation after many months of service.
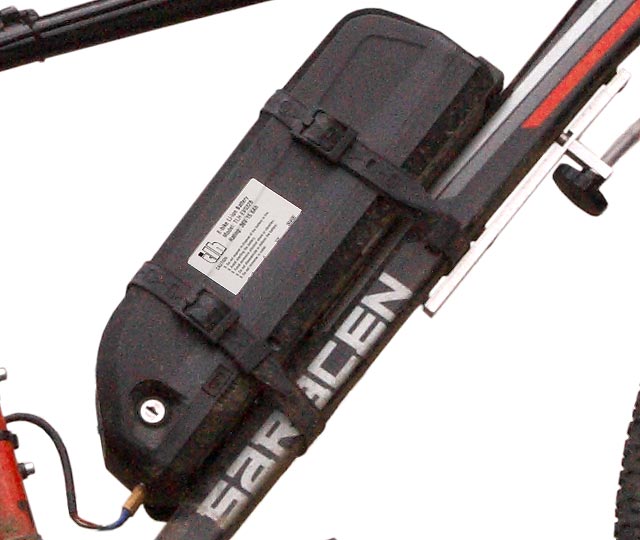
Battery with Beaver diving knife straps holding it to the bike frame.
Batteries: Links and additional info.
 Guide
to e-bike battery connectors.
Note, for
the purpose of making comparisons between the various battery
options, that some e-bike and battery manufacturers give the capacity
in Watt hours (Wh). Since power is given by voltage ×
current,
simply multiply the capacity in Ah by the nominal voltage to get the
figure in Wh. Thus a 15.6 Ah, 36 V battery (used with the Bafang BBS01)
is a 562 Wh unit
(rounded to the nearest whole number because the voltage is nominal and
varies throughout the discharge cycle). This is a lot bigger than the
batteries fitted to some commercial e-bikes, and there is now (≥
Oct 2019) a 20.4 Ah (734 Wh) version available.
Guide
to e-bike battery connectors.
Note, for
the purpose of making comparisons between the various battery
options, that some e-bike and battery manufacturers give the capacity
in Watt hours (Wh). Since power is given by voltage ×
current,
simply multiply the capacity in Ah by the nominal voltage to get the
figure in Wh. Thus a 15.6 Ah, 36 V battery (used with the Bafang BBS01)
is a 562 Wh unit
(rounded to the nearest whole number because the voltage is nominal and
varies throughout the discharge cycle). This is a lot bigger than the
batteries fitted to some commercial e-bikes, and there is now (≥
Oct 2019) a 20.4 Ah (734 Wh) version available.Last updated
2021-June-15
|
E-bike conversion |
E-bike Legal |
E-bike battery |
E-bike electrics |
Side stand |
Steering damper |
Electric m/c |